Friday, March 9, 2018

Tripod Based Drawing Stand


Sometime towards the end of last year I started drawing more. At first it was polite doodles on printer paper before I fell asleep at night. It has since spread to most hours of the day, not that I can draw that often, but the lines and weights and colors of everything absorb most of my attention. Maybe this is a result of introducing quinoa into my diet. In any case, I want to be able to convey their presence!

I assembled a tripod easel thing to aid me on my quest. This has been done thousands of times before, we all have our own little nit-picky needs to fulfill. I think there are even commercially available pochade boxes that attach to a tripod, and french easels, and tripod easels. I wanted something stout and that enabled me to rotate the paper.

Below, I made this aluminum mounting plate which has a piece of HDPE sheet screwed to it. If it's damp out I'll probably use this work surface. Maybe I'll screw something else to it if I have any ideas.


Here is a larger wooden surface with a beech dovetail that fits in the slot on the tripod head just like the other mounting plates. I will use this for large sheets of paper, 11x15" or so.


Lastly, for supporting the habit of drawing bedside, I attached a mounting plate permanently to the aluminum clipboard with solid brass rivets:


Here is the tripod ballhead in all its beaming whiz-gizmo. I'll inform you and the governor if I ever use the bubble levels on it.


Bonus content for your persistence. When looking out this window, through the bug screen, at the chain-link fence nearly a block away, an interference pattern is formed. The pattern is the same as the chain-link fence, but magnified! If the observer has good vision, it's not noticeable, but by blurring the eyes (or setting the camera to focus at ~50cm and turning the f-stop up) it becomes visible. The image is distorted corresponding to the inaccuracies in the screen mesh; the weft is not perfectly level and straight (if you will). The mesh also magnifies other patterns.


Monday, February 19, 2018

Sailboat Window Covers


I made these window covers for my brother's sailboat. The perimeter of the windows has a little slot in the extrusion, which holds the covers in place. The slot is about 8mm deep and 6mm wide. The fabric has interfacing sewn into it to give the covers enough stiffness to hold themselves in place. Each window was traced onto clear plastic to obtain the pattern. There are two more small windows I made covers for, not pictured.


These replace a curtain which hung from the taut cord with the clothespins on it. By making the covers instead sit flush to the window, the inside of the boat feels a bit bigger!

Oyster Knife Handle


This is an oyster knife my neighbor was gifted. He liked the shape, but the sharp handle end of it dug into his hand when he pried apart oysters. He hired me to make a handle for it. I knew it would be difficult because the handle tapers in two directions; the handle would have to have a complex mortise to receive it. I drew a handful of ideas, and he liked this version:


I decided to try to make it in two pieces, out of ebony. I roughed out the shape with the milling machine, which didn't have to be super precise as the epoxy would fill the gaps. However, I wanted to keep the fit very tight where the knife protruded from the handle, to make for a clean seam. I reduced the size of the milled slot there, so that I could hand-file the opening to fit the profile of the handle. This was made more difficult because the knife was not symmetrical; it was ground by hand.


The knife fitted snugly in the milled slots. I put a little bit of oil on the knife, pressed it into the opening, and filed away the neck where the knife contacts it. Bit by bit, I work down until the two halves close tightly around the knife, always minding the ebony blocks are mated to their corresponding sides of the handle.


Below you can see the reduced neck of the opening where I am filing:


And here they are closed:


I was cleaning as I went, but there were so many tools involved! It was a challenge projecting all the faces of the knife into the handle. This is probably a third or half of the tools I used-


I shaped the front face of the wooden handle before epoxying them together. After it was glued into a solid block, it would be difficult to shape the front face without scratching the oyster knife. Here it is being glued together:


After a couple hours of shaping and sanding:


Here it is in comparison to the original drawing:


In hindsight, it would have taken less time to make a knife from scratch. The result is special though; it looks and feels nice, and it retains the sentimental value of the oyster knife.

Friday, February 9, 2018

Sailboat Cushions I and II


The first two of about ten cushions for the sailboat-


The cushion underneath (above) and below is the first one I made. The wrinkles are due to me not teasing the foam around inside, and putting too much tension into the piping as I sewed.


Below is the inside of the cushion, showing the grosgrain I used to bind the edges of the fabric. This is the ugliest part of these--


This is Sunbrella Dupione Henna fabric, with burgundy v-69 thread.

Below are some more fabric mats I made for dad's drawer chests. These are a little more stable and accurate than the last ones. Like the first part off a CNC machine in a production run, maybe it's more about what you can learn from the first part than the luck factor of getting it all right the first time.


Drafting Square


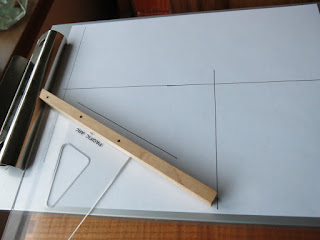
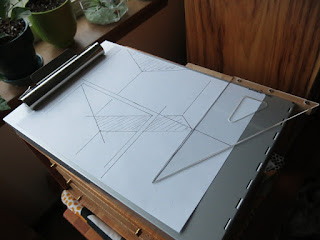
Another accessory for the clipboard. It was stewing in my mind for a few months, the missing piece. The body of the clipboard and clip are quite square to each other.


The screws are countersunk so that it can be flipped upside down and used against the clip:


The angled side can be used for isometric projection:


The fence extends so it can be used with most of the square overhanging the edge:


And it fits nicely inside the clipboard: