Monday, August 27, 2018

T-Slot Nuts: Minimum Effort Edition

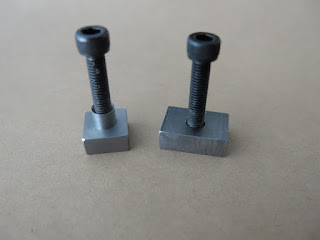
Kind of humbling to have to make one's own T-slot nuts in this era. I did it once before using this method when I first started machining at home.


Couldn't find Taig-sized nuts from the usual suspects so I decided it would be best to just make them myself. I initially thought the style on the left (above) would be fast to make, but without a square collet and a rigid lathe it's a slog.

Yesterday I started bucking off 1/2" pieces from a bar of 1018. Absolutely unremarkable in every way except for the little fixture I made for drilling and tapping them this morning:


Nope, I think I was right the first time, absolutely unremarkable in every way. You may notice the slightly over-sized aluminum sub-plate there. I intend to use it for other things, have needed one for a while.

I made a dozen of the nuts:


one two three four six seven twelve

Despite being so rough and rushed, they ain't bad. The threads are square to the shoulders, they are steel, they are all nice and deburred, and there's more meat there than the 1/8" thick ones that came with it.

If the last ones are any indication, they'll do just fine for the next eight years.

Sunday, August 26, 2018

Frame Saw for Metal

I have wanted a frame saw something awful bad for a few years, to use for sawing metal. I think I was blessed (or cursed?) at birth to spend my life hacksawing. It's not as bad as people make it out to be; it's a very accurate tool. Accuracy at the saw is worth a pound of cure at the mill, or often in my case, the hand file. It's not difficult to saw +/- .010", and +/- .004" is not out of the question when all my ducks are in a row.

No matter how it's done, sawing steel is kind of a pain in the butt. Be it metal grit in your collar (glowing hot or just hot enough to burn), a mighty physical workout, or funky old coolant that dearly wants to find a way back to the earth, no method is without its drawbacks. I once bought and restored a little power hacksaw, but it was even slower than hacksawing by hand--I think due to the short stroke, wide kerf, and its lack of deductive reasoning ability. Who am I to blame though?

I once nearly bought an Ellis horizontal band saw, but kept the money instead--my favorite saws for metal are dedicated vertical bandsaws. They are relatively peaceful and versatile.

A couple months ago I found the saw design of Blackburn Tools, which struck me as especially pretty--I just sort of memorized the general form and sketched it out on the wood I had. The wood came from the ReStore, I think it might be alder. I got the idea for the pins from Sean Hellman. The whole thing, including making the three blades, took a full day of work and maybe $20 in materials.


I had put it off for a long time because I thought I didn't have the technology for drilling holes in the hardened blade. I really worked it up in my mind that it was a difficult undertaking. Yesterday I took an $8.50 diamond 'stone' to a $2.60 carbide tipped masonry bit to sharpen it. It drilled so easily and quickly, I felt like an idiot for putting it off so long. To cut the blade, I just clamped it in the vise and bent it back and forth.


The whole thing feels absurdly light to me. I used Kevlar thread for the tensioning string. Like a spoked wheel, it's such an elegant design.


Below is the hacksaw it mostly replaces. I finally snapped yesterday while using it because the thick coating of paint on the blade was making the blade steer unpredictably. It also squeals! Whether the blade is loose or tight, wax-lubed or bone-dry, pressed hard or gently, it really can get loud. I work mostly in a shared apartment, and do my best to keep the people around me happy. I often pressed the pinky of my leading hand against the blade to quiet it down, which feels a bit risky; fortunately I haven't slipped yet. I have even clamped large rubber dampers to the frame and blade, which reduces the noise at expense of stroke length. Which brings my to my last gripe, the short stroke! I am a tall and lanky machine, I feel like I'm pedaling a children's bike with a 12" hacksaw.


I must have sewn through logs of solid steel with that hacksaw by now. Below are some recent victims. 1" x 3" 1018 on the top left, .75 x 3" top right, and underneath is a .75" x 6" slice off a plate of hardened (RC 30) 4140 to make a hatchet stake. New ones are expensive, alright?


Today I put ol' faithful head-to-head with the saw I just made. I tested it on these blanks for odd-sized t-slot-nuts, .25" x .75" 1018 steel. I also tested it against my powered jigsaw at its lowest speed (I'm in an apartment, remember).


Frame saw: 1 min 30 sec - 3 min 30 sec
Hacksaw: 2 min - 4 min
Jigsaw: 1 min 30 sec

The slow speeds represent accurate cuts at comfortable pace. The fast speeds represent breaking-a-sweat speed with less attention to accuracy. All new blades, which might actually be a handicap to the hacksaw due to the idiot at the factory that paints them with ten coats of truck bed liner. The jigsaw, while fastest, was not nearly as accurate. All the pieces were within a .015" window in length :)


The frame saw is also quieter than the other two. I can't bear to put the blade in my hacksaw backwards, but the frame saw is quieter and more confident cutting on the pull stroke. I think once I get comfortable with it, I'll be ready to race the 2500 lb hyd-mech bandsaw at the tech school* ;)

I look forward to trying other blade types in it. The blades I made for it are 14 tpi modified-raker set, and it's clear that vibration was the biggest thing holding it back. I wonder if wavy-set or variable pitch blades would cut better. In any case, the Starrett bandsaw blade stock feels a lot sharper and more precise than any hacksaw blade I've used.

*material cut: 1/4" aluminum tube

Saturday, August 18, 2018

Bar Stool - Hand Tool vs Power


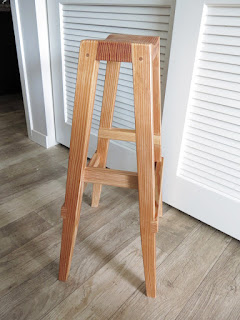
Finished this bar stool after carrying around the pieces for two years. The main pieces were ripped on the bandsaw, but otherwise it was pretty much made on potato power. Douglas fir is so ornery to work with hand tools, in the sneakiest ways. It probably would have been more precise and faster to make in another wood, but I like the character of the finished chair. Not afraid to scratch it-


The side stretchers are recycled stilts I made for my girlfriend. She didn't use them and gave me permission to cut 'em up.


This chair is now sitting beside another chair which has a lot in common with it: made of douglas fir, a one-off design made by the seat of the pants, both made in free time. They share some interesting differences though-


The one on the right was made by my dad almost entirely with power tools. The legs were bandsawn of 4x4's, the seat was carved with an angle grinder and bandsaw, and it is jointed with mortise-and-tenons done with mortising machine/table saw. It was finished with a random orbital sander and rasps.


The one on the left was made in a 4' square space, using various hand saws and planes. The top was carved with a hatchet, and it is jointed with cherry dowels I cut and turned by hand. It was finished with rasps and a little bit of sanding. I think the designs reflect the tools they were made with; each would be a pain in the ass to make with the other method.

The one I made is less comfortable and has a rougher finish, but is lighter and used probably a 20% of the wood as the other one. It is equally comfortable to sit on frontwards/backwards. The one dad made is better suited to a wider range of butts, but feels weird to sit on backwards. Being a stool, it does get sat on in all directions. It's worth pointing out that dad has made much nicer stools since-


One more stool of interest! I made this one on the floor of a carport (where dad later built his shop) right after I moved to Bellingham. The wood came from a dumpster next door where my neighbors were building their house; it's also made of douglas fir. I used an awful hand saw, a block plane, a jigsaw, and a drill. Still, it has been a lovely stool! It's very rigid and has been sat on by many a butt in the four years it's been around.

Tuesday, August 14, 2018

Phone Case Mark Two

I TOLD YOU there would be a rev. 2!!!

Ahem


Stitching wool liner with wooden form (above)

Made of cotton duck this time.


Inside is a bit how-ya-doin', but the hand-sewing allows the outside to keep clean lines. If the last five years are any indication, it's not going to fray anytime soon either.


Saturday, August 11, 2018

Refined Baldor 7 Inch Bench Grinder


I've really wanted a nice bench grinder since 2010, when I used the baldor in the high school shop. I bought one nearly two years ago, but didn't get to it until now. I put together a nice belt grinder with VFD, but a belt grinder is just not as refined. Grinding cutters on a quiet and stable bench grinder has to be one of the most relaxing activities.

The Baldor came pretty rough from the factory and I resolved to make it nice. The tool rests were crooked and wobbly, and the wheel flanges/bushings weren't very accurate. The shaft was pretty concentric through, so it was worth fixing. For accurate grinding of drills and cutters, a solid and flat tool rest is helpful. I set mine 1/2" below wheel centerline. I can put spacers beneath the item to be ground to accurately set a grind angle.


I made the rests of 1/2" mild steel using hacksaw and file, and the Taig lathe to mill the slot and drill the screw holes. I machined the bushings all on the Taig lathe.


I used the Oneway balancing kit to balance the wheels. It works alright; the balancing stand is not very sensitive but the flanges are nice and accurate.

You can see it running here.

I set up a fixture for sharpening a drill, and for the first time I split the point on a twist drill effectively. Sharpening drills freehand is a controversial topic because people have such wildly varying ideas of what a twist drill should be able to do.

I've had many US-made machine-sharpened drills which are sharpened worse than I could do by hand. Obviously, machines can do a much better job than I can do freehand too. You basically get what you pay for--a $25 twist drill is bound to be alright.

For accurate drilling in home shop, I like Chicago-Latrobe screw-machine length drills. They have a super crisp split point and their short length can actually take advantage of a rigid setup. They don't tend to make lobed hole during start unlike jobber-length bits (when used without guide clamped to surface).

Next challenge is grinding a brad-point bit for sheet metal :)

Longboard Wheel Truing Mandrel


Made this mandrel for a friend to help him turn the flat spots off longboard wheels.


The fixed bushing is held in place with a taper pin.

When I dropped it off at the skateboard shop, the guy there was interested in making a gang arrangement on a dedicated lathe to true up four skateboard wheels at a time. I doubt he'll actually go through with it, but I'll share it here if he does.

A conventional shearing cutter used for metals doesn't work for cutting the wheel, a slicing tool is needed to cut off a band from the outer surface. I didn't bother to grind a special tool, instead I just flipped a thread cutting tool upside-down to see if it worked. A dedicated cutter wouldn't be too hard to make and would do a lot better than this mess:


Wednesday, August 8, 2018

Crossbow Roller Nut

I got a crossbow kit from Alchem Inc. when I was about ten. I never finished a crossbow, but I hung onto the parts for... 14 years now. I finally sold them for peanuts to an excited SCA member.

As a token to my fifth-grade self who didn't have the tools or knowledge to make a decent roller nut, I made a blank to send with the rest of the kit:


I didn't have any metal adhesive, so the steel parts are just a tight interference fit with the aluminum body. I hope the recipient puts it to good use :)

Friday, August 3, 2018

Composite roping palm

My leather seaming palm has served me well. I don't know how I sewed heavy stuff before I had it, but I imagine there was a bit of blood and something to do with pliers. Paired with the needle it's such a capable and portable tool. A picture is worth a thousand words: pre-sewing-machine, this was the tool behind the needle as people sewed entire suits of sails. Sailmakers still use them to reinforce parts of sails. I use them to fix my clothes and make bags-


(photo by Shannon Gallagher)
Sails have changed a lot. Sailmaker's palms ought to have a chance at modern materials and production methods too.

I'm having a go. I started a few days ago, making different designs of foil, tape, and sheet steel. A sturdy palm that fits the user well is rare. My current plan is to distill three sizes of palms, that will accommodate the majority of hands.


These prototypes are kind of homely, but I want to be certain of the shape and general design before I clean out my wallet to have the first mold machined. They need to be comfortable, tough as heck, repairable, and easy on the eyes. I'm working with a friend to make the composite base, the rest will be up to me and maybe a machine shop.